Have a Question?
[NOKIA] OLT Integration with HALNy SFU 2 LAN
HALNy Integration
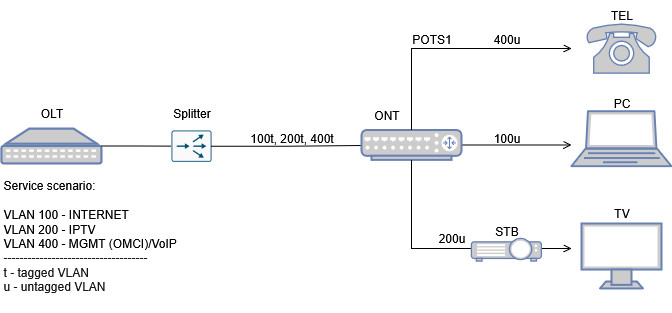
Supported service scenarios
1. ONT Configuration (Access Mode – INTERNET/IPTV/VoIP)
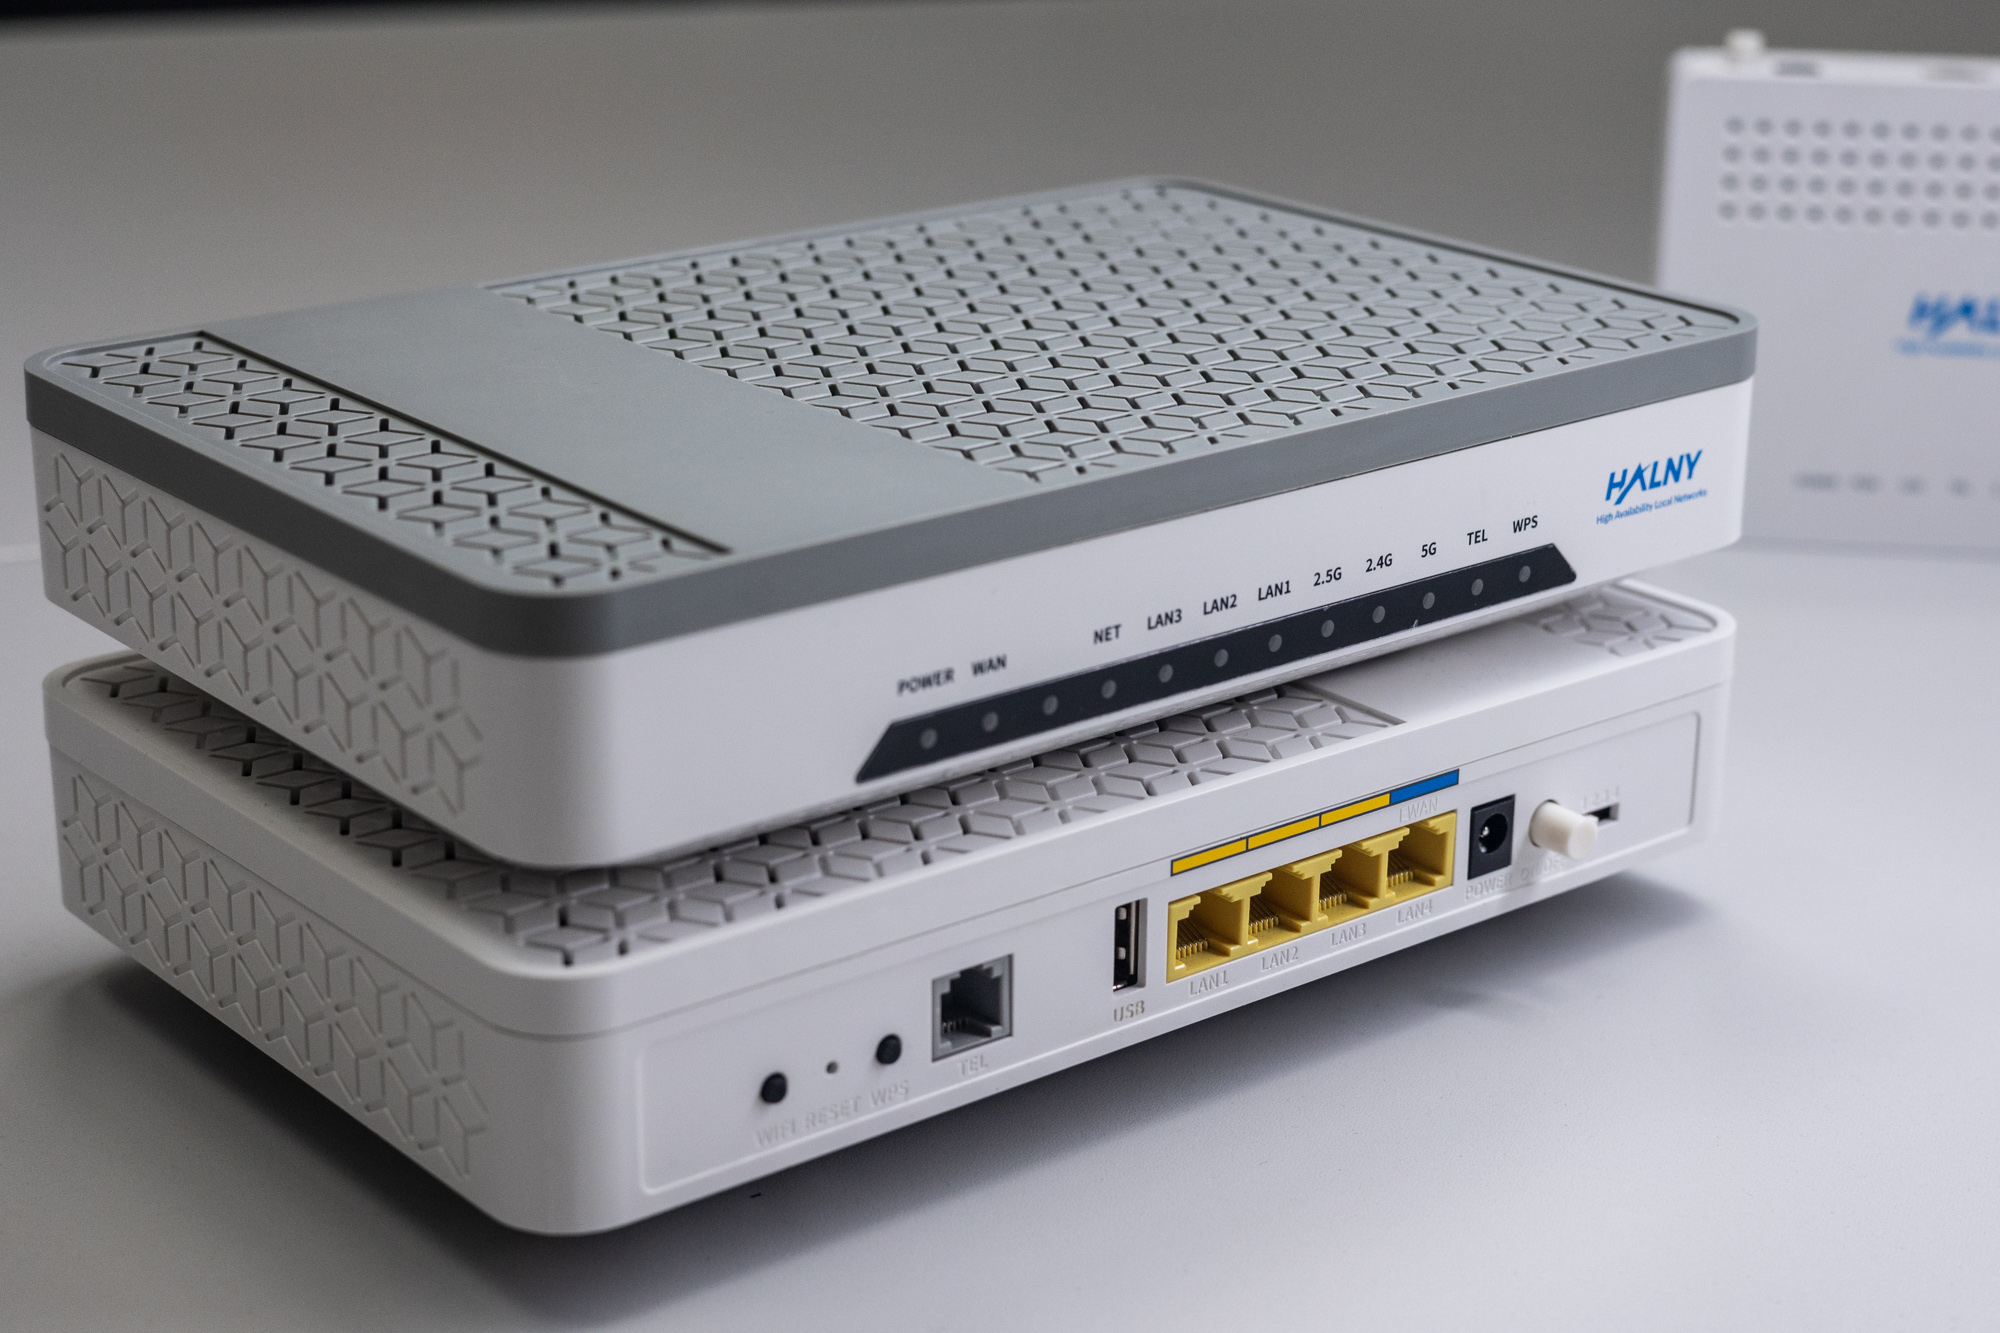
Attention: Following configuration example is based on the HL-2BV model, which features 2 LAN ports and 1 POTS ports. Adjust the configuration as needed to suit your ONT model.
ONT is connected to the port 1/1/1/1 with onu ID 8
1. Create ONT interface and set up admin-state
#configure equipment ont interface 1/1/1/1/8 sernum HALN:5A6FA670 sw-ver-pland disabled iphc-allowed enable enable-aes disable
configure>equipment>ont>interface>1/1/1/1/8 admin-state up
2. Plan card slot type and definie quantity and type of ports (2 ETH in case of HL-2BV ) and 1x POTS
Remember to correctly specify the number of LAN and POTS ports on your ONT!
#configure equipment ont slot 1/1/1/1/8/1 planned-card-type 10_100base plndnumdataports 2 plndnumvoiceports 0 admin-state up
#configure equipment ont slot 1/1/1/1/8/4 planned-card-type pots plndnumdataports 0 plndnumvoiceports 1 admin-state up
NOTE:
Slot 1 is for Ethernet card -> #configure equipment ont slot 1/1/1/1/8/1
Slot 4 is for POTS card-> #configure equipment ont slot 1/1/1/1/8/4
Only for HLX-TGV model:
Slot 8 is for Ethernet 10G port/card -> #configure equipment ont slot 1/1/1/13/8
Configuration for HLX-TGV differs and is shown below.
#configure equipment ont slot 1/1/1/1/8/1 planned-card-type 10_100base plndnumdataports 1 plndnumvoiceports 0 admin-state up
#configure equipment ont slot 1/1/1/1/8/4 planned-card-type pots plndnumdataports 0 plndnumvoiceports 2 admin-state up
#configure equipment ont slot 1/1/1/1/13/8 planned-card-type ethernet plndnumdataports 1 plndnumvoiceports 0 admin-state up
3. Create QoS profile
#configure qos profiles bandwidth 1G committed-info-rate 0 assured-info-rate 0 excessive-info-rate 1000000
#configure qos profiles bandwidth 10G committed-info-rate 0 assured-info-rate 0 excessive-info-rate 10000000
4. Set ethernet ports speed/duplex and assign DBA profile
Attention: For ONT’s which have port 10G please use qos profile 10G
#configure ethernet ont 1/1/1/1/8/1/1 auto-detect auto admin-state up
#configure ethernet ont 1/1/1/1/8/1/2 auto-detect auto admin-state up
#configure qos interface 1/1/1/1/8/1/1 upstream-queue 0 bandwidth-profile name:1G
#configure qos interface 1/1/1/1/8/1/2 upstream-queue 0 bandwidth-profile name:1G
Configuration for HLX-TGV differs and is shown below.
#configure ethernet ont 1/1/1/1/8/1/1 auto-detect auto admin-state up
#configure ethernet ont 1/1/1/1/8/8/1 auto-detect auto admin-state up
#configure qos interface 1/1/1/1/8/1/1 upstream-queue 0 bandwidth-profile name:10G
#configure qos interface 1/1/1/1/8/8/1 upstream-queue 0 bandwidth-profile name:10G
5. Add vlan 100 to the bridge port eth1 and vlan 200 to the bridge port eth2
admin>#configure bridge port 1/1/1/1/8/1/1
admin>configure>bridge>port>1/1/1/1/8/1/1$ vlan-id 100 tag untagged
admin>configure>bridge>port>1/1/1/1/8/1/1>vlan-id>100$ exit
admin>configure>bridge>port>1/1/1/1/8/1/1# pvid 100
admin>configure>bridge>port>1/1/1/1/8/1/1# max-unicast-mac 10

admin>#configure bridge port 1/1/1/1/8/1/2
admin>configure>bridge>port>1/1/1/1/8/1/2$ vlan-id 200 tag untagged
admin>configure>bridge>port>1/1/1/1/8/1/2>vlan-id>200$ exit
admin>configure>bridge>port>1/1/1/1/8/1/2# pvid 200
admin>configure>bridge>port>1/1/1/1/8/1/2# max-unicast-mac 10
Configuration for HLX-TGV differs and is shown below.
admin>#configure bridge port 1/1/1/1/8/1/1
admin>configure>bridge>port>1/1/1/1/8/1/1$ vlan-id 200 tag untagged
admin>configure>bridge>port>1/1/1/1/8/1/1>vlan-id>200$ exit
admin>configure>bridge>port>1/1/1/1/8/1/1# pvid 200
admin>configure>bridge>port>1/1/1/1/8/1/1# max-unicast-mac 10
admin>#configure bridge port 1/1/1/1/8/8/1
admin>configure>bridge>port>1/1/1/1/8/8/1$ vlan-id 100 tag untagged
admin>configure>bridge>port>1/1/1/1/8/8/1>vlan-id>100 exit
admin>configure>bridge>port>1/1/1/1/8/8/1# pvid 100
admin>configure>bridge>port>1/1/1/1/8/8/1# max-unicast-mac 10
6. Configure ip-host 1 for VoIP and management
#configure qos interface 1/1/1/1/8/vuni upstream-queue 0 bandwidth-profile name:1G
#configure bridge port 1/1/1/1/8/vuni
#configure>bridge>port>1/1/1/1/8/vuni$ vlan-id 400
#configure iphost ont ont:1/1/1/1/8/1 dhcp enabled vlan 400
#configure iphost ont ont:1/1/1/1/8/1 admin-state up
7. Configure and enable VOIP port
#configure interface port voip:1/1/1/1/8 admin-up
#configure voice ont voip-config ont:1/1/1/1/8/1 protocol sip
8. Add SIP configuration profiles (global config)
#configure voice ont auth-sec-prof 7 name CENTRALA_VOIP validation-scheme md5-digest realm 172.16.16.2
#configure voice ont uri-prof 7 name CENTRALA_VOIP address 172.16.16.2
#configure voice ont sec-uri-profile 7 name CENTRALA_VOIP auth-securi-prof 7 uri-prof 7
#configure voice ont voip-app-service 7 name CENTRALA_APP calling-number enable calling-name enable caller-id-number private caller-id-name private dir-conn-prof none bridge-prof none conf-prof none
9. Add VoIP account configuration
configure voice ont sip-config ont:1/1/1/1/8/1 proxyserv-prof 7 outproxyserv-prof 7 aor-host-prt-prof 7 registrar-prof 7
configure voice ont voice-sip-port 1/1/1/1/8/4/1 display-name 9001 user-name 9001 password plain:123456 app-serv-prof 7
configure voice ont voice-port 1/1/1/1/8/4/1 voipconfig sip admin-state unlocked
configure voice ont pots 1/1/1/1/8/4/1 admin-state unlocked
9*. Add VoIP account configuration with dial plan (optional)
configure voice ont nwdial-plan-prof 3 name test digitmap1 "411|[0-1][2-9]xxxxxxxxxT|[2-9]xxxxxxxxxT"
configure voice ont sip-config ont:1/1/1/1/8/1 proxyserv-prof 7 outproxyserv-prof 7 aor-host-prt-prof 7 registrar-prof 7
configure voice ont voice-sip-port 1/1/1/1/8/4/1 display-name 9001 user-name 9001 password plain:123456 app-serv-prof 7 ntwk-dp-prof 3
configure voice ont voice-port 1/1/1/1/8/4/1 voipconfig sip admin-state unlocked
configure voice ont pots 1/1/1/1/8/4/1 admin-state unlocked
10. Display ONT ip-host 1 address
#show iphost ont operational-data
operational-data table
=========================================================================================================
index                    |ip-address     |net-mask       |default-router |dns-addr      |sec-dns-addr
-------------------------+---------------+---------------+---------------+--------------+---------------
ont:1/1/1/1/8/1           172.17.180.90    255.255.255.0   172.17.180.1   172.16.180.240  185.228.168.168
NOTE: In order to ip-host work properly, the broadcast should be enabled on VLAN
#configure vlan id 400 new-broadcast enable2. ONT Configuration (Transparent Mode – INTERNET, VOIP, IPTV)
Attention: Following configuration example is based on the HL-2BV model, which features 2 LAN ports and 1 POTS ports. Adjust the configuration as needed to suit your ONT model.
1. Create ONT interface and set up admin-state
#configure equipment ont interface 1/1/1/1/8 sernum HALN:5A6FA670 sw-ver-pland disabled iphc-allowed enable enable-aes disable
configure>equipment>ont>interface>1/1/1/1/8 admin-state up
2. Plan card slot type and definie quantity and type of ports (2 ETH in case of HL-2BV ) and 1x POTS
Remember to correctly specify the number of LAN and POTS ports on your ONT!
#configure equipment ont slot 1/1/1/1/8/1 planned-card-type 10_100base plndnumdataports 2 plndnumvoiceports 0 admin-state up
#configure equipment ont slot 1/1/1/1/8/4 planned-card-type pots plndnumdataports 0 plndnumvoiceports 1 admin-state up
NOTE:
Slot 1 is for Ethernet card -> #configure equipment ont slot 1/1/1/1/8/1
Slot 4 is for POTS card-> #configure equipment ont slot 1/1/1/1/8/4
Only for HLX-TGV model:
Slot 8 is for Ethernet 10G port/card -> #configure equipment ont slot 1/1/1/13/8
Configuration for HLX-TGV differs and is shown below.
#configure equipment ont slot 1/1/1/1/8/1 planned-card-type 10_100base plndnumdataports 1 plndnumvoiceports 0 admin-state up
#configure equipment ont slot 1/1/1/1/8/4 planned-card-type pots plndnumdataports 0 plndnumvoiceports 2 admin-state up
#configure equipment ont slot 1/1/1/1/13/8 planned-card-type ethernet plndnumdataports 1 plndnumvoiceports 0 admin-state up
3. Create QoS profile
#configure qos profiles bandwidth 1G committed-info-rate 0 assured-info-rate 0 excessive-info-rate 1000000
#configure qos profiles bandwidth 10G committed-info-rate 0 assured-info-rate 0 excessive-info-rate 10000000
4. Set ethernet ports speed/duplex and assign DBA profile
Attention: For ONT’s which have port 10G please use qos profile 10G
#configure ethernet ont 1/1/1/1/8/1/1 auto-detect auto admin-state up
#configure ethernet ont 1/1/1/1/8/1/2 auto-detect auto admin-state up
#configure qos interface 1/1/1/1/8/1/1 upstream-queue 0 bandwidth-profile name:10G
#configure qos interface 1/1/1/1/8/1/2 upstream-queue 0 bandwidth-profile name:10G
5. Add vlan 100 and 200 to the bridge port eth1 and eth2
admin>#configure bridge port 1/1/1/1/8/1/1
admin>configure>bridge>port>1/1/1/1/8/1/1$ vlan-id 200 tag tagged
admin>configure>bridge>port>1/1/1/1/8/1/1>vlan-id>200$ exit
admin>configure>bridge>port>1/1/1/1/8/1/1# max-unicast-mac 10

admin>#configure bridge port 1/1/1/1/8/1/1
admin>configure>bridge>port>1/1/1/1/8/1/1$ vlan-id 100 tag tagged
admin>configure>bridge>port>1/1/1/1/8/1/1>vlan-id>100$ exit
admin>configure>bridge>port>1/1/1/1/8/1/1# max-unicast-mac 10

admin>#configure bridge port 1/1/1/1/8/1/2
admin>configure>bridge>port>1/1/1/1/8/1/2$ vlan-id 200 tag tagged
admin>configure>bridge>port>1/1/1/1/8/1/2>vlan-id>200$ exit
admin>configure>bridge>port>1/1/1/1/8/1/2# max-unicast-mac 10

admin>#configure bridge port 1/1/1/1/8/1/2
admin>configure>bridge>port>1/1/1/1/8/1/2$ vlan-id 100 tag tagged
admin>configure>bridge>port>1/1/1/1/8/1/2>vlan-id>100$ exit
admin>configure>bridge>port>1/1/1/1/8/1/2# max-unicast-mac 10
Configuration for HLX-TGV differs and is shown below.
admin>#configure bridge port 1/1/1/1/8/1/1
admin>configure>bridge>port>1/1/1/1/8/1/1$ vlan-id 200 tag untagged
admin>configure>bridge>port>1/1/1/1/8/1/1>vlan-id>200$ exit
admin>configure>bridge>port>1/1/1/1/8/1/1# pvid 200
admin>configure>bridge>port>1/1/1/1/8/1/1# max-unicast-mac 10
admin>#configure bridge port 1/1/1/1/8/8/1
admin>configure>bridge>port>1/1/1/1/8/8/1$ vlan-id 100 tag untagged
admin>configure>bridge>port>1/1/1/1/8/8/1>vlan-id>100$ exit
admin>configure>bridge>port>1/1/1/1/8/8/1# pvid 100
admin>configure>bridge>port>1/1/1/1/8/8/1# max-unicast-mac 100
6. Configure ip-host 1 for VoIP and management
#configure qos interface 1/1/1/1/8/vuni upstream-queue 0 bandwidth-profile name:1G
#configure bridge port 1/1/1/1/8/vuni
#configure>bridge>port>1/1/1/1/8/vuni$ vlan-id 400
#configure iphost ont ont:1/1/1/1/8/1 dhcp enabled vlan 400
#configure iphost ont ont:1/1/1/1/8/1 admin-state up
7. Configure and enable VOIP port
#configure interface port voip:1/1/1/1/8 admin-up
#configure voice ont voip-config ont:11/1/1/1/8/1 protocol sip
8. Add SIP configuration profiles (global config)
#configure voice ont auth-sec-prof 7 name CENTRALA_VOIP validation-scheme md5-digest realm 172.16.16.2
#configure voice ont uri-prof 7 name CENTRALA_VOIP address 172.16.16.2
#configure voice ont sec-uri-profile 7 name CENTRALA_VOIP auth-securi-prof 7 uri-prof 7
#configure voice ont voip-app-service 7 name CENTRALA_APP calling-number enable calling-name enable caller-id-number private caller-id-name private dir-conn-prof none bridge-prof none conf-prof none
9. Add VoIP account configuration
configure voice ont sip-config ont:1/1/1/1/8/1 proxyserv-prof 7 outproxyserv-prof 7 aor-host-prt-prof 7 registrar-prof 7
configure voice ont voice-sip-port 1/1/1/1/8/4/1 display-name 9001 user-name 9001 password plain:123456 app-serv-prof 7
configure voice ont voice-port 1/1/1/1/8/4/1 voipconfig sip admin-state unlocked
configure voice ont pots 1/1/1/1/8/4/1 admin-state unlocked
10. Display ONT ip-host 1 address
#show iphost ont operational-data
operational-data table
=========================================================================================================
index                    |ip-address     |net-mask       |default-router |dns-addr      |sec-dns-addr
-------------------------+---------------+---------------+---------------+--------------+---------------
ont:1/1/1/1/8/1           172.17.180.90    255.255.255.0   172.17.180.1   172.16.180.240  185.228.168.168
NOTE: In order to ip-host work properly, the broadcast should be enabled on VLAN
#configure vlan id 400 new-broadcast enable3. ONT Configuration (Hybrid mode)

Attention: Following configuration example is based on the HL-2BV model, which features 2 LAN ports and 1 POTS ports. Adjust the configuration as needed to suit your ONT model.
1. Create ONT interface and set up admin-state
#configure equipment ont interface 1/1/1/1/8 sernum HALN:5A6FA670 sw-ver-pland disabled iphc-allowed enable enable-aes disable
configure>equipment>ont>interface>1/1/1/1/8 admin-state up
2. Plan card slot type and definie quantity and type of ports (2 ETH in case of HL-2BV ) and 1x POTS
Remember to correctly specify the number of LAN and POTS ports on your ONT!
#configure equipment ont slot 1/1/1/1/8/1 planned-card-type 10_100base plndnumdataports 2 plndnumvoiceports 0 admin-state up
#configure equipment ont slot 1/1/1/1/8/4 planned-card-type pots plndnumdataports 0 plndnumvoiceports 1 admin-state up
NOTE:
Slot 1 is for Ethernet card -> #configure equipment ont slot 1/1/1/1/8/1
Slot 4 is for POTS card-> #configure equipment ont slot 1/1/1/1/8/4
Only for HLX-TGV model:
Slot 8 is for Ethernet 10G port/card -> #configure equipment ont slot 1/1/1/13/8
Configuration for HLX-TGV differs and is shown below.
#configure equipment ont slot 1/1/1/1/8/1 planned-card-type 10_100base plndnumdataports 1 plndnumvoiceports 0 admin-state up
#configure equipment ont slot 1/1/1/1/8/4 planned-card-type pots plndnumdataports 0 plndnumvoiceports 2 admin-state up
#configure equipment ont slot 1/1/1/1/13/8 planned-card-type ethernet plndnumdataports 1 plndnumvoiceports 0 admin-state up
3. Create QoS profile
#configure qos profiles bandwidth 1G committed-info-rate 0 assured-info-rate 0 excessive-info-rate 1000000
#configure qos profiles bandwidth 10G committed-info-rate 0 assured-info-rate 0 excessive-info-rate 10000000
4. Set ethernet ports speed/duplex and assign DBA profile
Attention: For ONT’s which have port 10G please use qos profile 10G
#configure ethernet ont 1/1/1/1/8/1/1 auto-detect auto admin-state up
#configure ethernet ont 1/1/1/1/8/1/2 auto-detect auto admin-state up
#configure qos interface 1/1/1/1/8/1/1 upstream-queue 0 bandwidth-profile name:10G
#configure qos interface 1/1/1/1/8/1/2 upstream-queue 0 bandwidth-profile name:10G
5. Add vlan 100,300 to the bridge port eth1 and vlan 100, 200 to the bridge port eth2
admin>#configure bridge port 1/1/1/1/8/1/1
admin>configure>bridge>port>1/1/1/1/8/1/1$ vlan-id 300 tag single-tagged
admin>configure>bridge>port>1/1/1/1/8/1/1>vlan-id>300$ exit
admin>configure>bridge>port>1/1/1/1/8/1/1$ vlan-id 100 tag untagged
admin>configure>bridge>port>1/1/1/1/8/1/1>vlan-id>100$ exit
admin>configure>bridge>port>1/1/1/1/8/1/1# pvid 100
admin>configure>bridge>port>1/1/1/1/8/1/1# max-unicast-mac 10

admin>#configure bridge port 1/1/1/1/8/1/2
admin>configure>bridge>port>1/1/1/1/8/1/2$ vlan-id 100 tag single-tagged
admin>configure>bridge>port>1/1/1/1/8/1/2>vlan-id>100$ exit
admin>configure>bridge>port>1/1/1/1/8/1/2$ vlan-id 200 tag untagged
admin>configure>bridge>port>1/1/1/1/8/1/2>vlan-id>200$ exit
admin>configure>bridge>port>1/1/1/1/8/1/2# pvid 200
admin>configure>bridge>port>1/1/1/1/8/1/2# max-unicast-mac 10
Configuration for HLX-TGV differs and is shown below.
admin>#configure bridge port 1/1/1/1/8/1/1
admin>configure>bridge>port>1/1/1/1/8/1/1$ vlan-id 100 tag single-tagged
admin>configure>bridge>port>1/1/1/1/8/1/1>vlan-id>100$ exit
admin>configure>bridge>port>1/1/1/1/8/1/1$ vlan-id 200 tag untagged
admin>configure>bridge>port>1/1/1/1/8/1/1>vlan-id>200$ exit
admin>configure>bridge>port>1/1/1/1/8/1/1# pvid 200
admin>configure>bridge>port>1/1/1/1/8/1/1# max-unicast-mac 10

admin>#configure bridge port 1/1/1/1/8/8/1
admin>configure>bridge>port>1/1/1/1/8/8/1$ vlan-id 300 tag single-tagged
admin>configure>bridge>port>1/1/1/1/8/8/1>vlan-id>300$ exit
admin>configure>bridge>port>1/1/1/1/8/8/1$ vlan-id 100 tag untagged
admin>configure>bridge>port>1/1/1/1/8/8/1>vlan-id>100 exit
admin>configure>bridge>port>1/1/1/1/8/8/1# pvid 100
admin>configure>bridge>port>1/1/1/1/8/8/1# max-unicast-mac 10
6. Configure ip-host 1 for management
#configure qos interface 1/1/1/1/8/vuni upstream-queue 0 bandwidth-profile name:1G
#configure bridge port 1/1/1/1/8/vuni
#configure>bridge>port>1/1/1/1/8/vuni$ vlan-id 400
#configure iphost ont ont:1/1/1/1/8/1 dhcp enabled vlan 400
#configure iphost ont ont:1/1/1/1/8/1 admin-state up
7. Display ONT ip-host 1 address
#show iphost ont operational-data
operational-data table
=========================================================================================================
index                    |ip-address     |net-mask       |default-router |dns-addr      |sec-dns-addr
-------------------------+---------------+---------------+---------------+--------------+---------------
ont:1/1/1/1/8/1           172.17.180.90    255.255.255.0   172.17.180.1   172.16.180.240  185.228.168.168
NOTE: In order to ip-host work properly, the broadcast should be enabled on VLAN
#configure vlan id 400 new-broadcast enable4. ONT configuration (VLAN translation – rBSA)

Attention: Following configuration example is based on the HL-2BV model, which features 2 LAN ports and 1 POTS ports. Adjust the configuration as needed to suit your ONT model.
1. Create ONT interface and set up admin-state
#configure equipment ont interface 1/1/1/1/8 sernum HALN:5A6FA670 sw-ver-pland disabled iphc-allowed enable enable-aes disable
configure>equipment>ont>interface>1/1/1/1/8 admin-state up
2. Plan card slot type and definie quantity and type of ports (2 ETH in case of HL-2BV ) and 1x POTS
Remember to correctly specify the number of LAN and POTS ports on your ONT!
#configure equipment ont slot 1/1/1/1/8/1 planned-card-type 10_100base plndnumdataports 2 plndnumvoiceports 0 admin-state up
#configure equipment ont slot 1/1/1/1/8/4 planned-card-type pots plndnumdataports 0 plndnumvoiceports 1 admin-state up
NOTE:
Slot 1 is for Ethernet card -> #configure equipment ont slot 1/1/1/1/8/1
Slot 4 is for POTS card-> #configure equipment ont slot 1/1/1/1/8/4
Only for HLX-TGV model:
Slot 8 is for Ethernet 10G port/card -> #configure equipment ont slot 1/1/1/13/8
Configuration for HLX-TGV differs and is shown below.
#configure equipment ont slot 1/1/1/1/8/1 planned-card-type 10_100base plndnumdataports 1 plndnumvoiceports 0 admin-state up
#configure equipment ont slot 1/1/1/1/8/4 planned-card-type pots plndnumdataports 0 plndnumvoiceports 2 admin-state up
#configure equipment ont slot 1/1/1/1/13/8 planned-card-type ethernet plndnumdataports 1 plndnumvoiceports 0 admin-state up
3. Create QoS profile
#configure qos profiles bandwidth 1G committed-info-rate 0 assured-info-rate 0 excessive-info-rate 1000000
#configure qos profiles bandwidth 10G committed-info-rate 0 assured-info-rate 0 excessive-info-rate 10000000
4. Set ethernet ports speed/duplex and assign DBA profile
Attention: For ONT’s which have port 10G please use qos profile 10G
#configure ethernet ont 1/1/1/1/8/1/1 auto-detect auto admin-state up
#configure ethernet ont 1/1/1/1/8/1/2 auto-detect auto admin-state up
#configure qos interface 1/1/1/1/8/1/1 upstream-queue 0 bandwidth-profile name:10G
#configure qos interface 1/1/1/1/8/1/2 upstream-queue 0 bandwidth-profile name:10G
5. Add vlan 100 and 200 to the bridge port eth1 and eth2
admin>#configure bridge port 1/1/1/1/8/1/1
admin>configure>bridge>port>1/1/1/1/8/1/1$ vlan-id 35 l2fwder-vlan 100 vlan-scope local
admin>configure>bridge>port>1/1/1/1/8/1/1>vlan-id>35$ exit
admin>configure>bridge>port>1/1/1/1/8/1/1$ vlan-id 838 l2fwder-vlan 200 vlan-scope local
admin>configure>bridge>port>1/1/1/1/8/1/1>vlan-id>838$ exit
admin>configure>bridge>port>1/1/1/1/8/1/1$ vlan-id 839 l2fwder-vlan 300 vlan-scope local
admin>configure>bridge>port>1/1/1/1/8/1/1>vlan-id>839$ exit
admin>configure>bridge>port>1/1/1/1/8/1/1# max-unicast-mac 10

admin>#configure bridge port 1/1/1/1/8/1/2
admin>configure>bridge>port>1/1/1/1/8/1/2$ vlan-id 35 l2fwder-vlan 100 vlan-scope local
admin>configure>bridge>port>1/1/1/1/8/1/2>vlan-id>35$ exit
admin>configure>bridge>port>1/1/1/1/8/1/2$ vlan-id 838 l2fwder-vlan 200 vlan-scope local
admin>configure>bridge>port>1/1/1/1/8/1/2>vlan-id>838$ exit
admin>configure>bridge>port>1/1/1/1/8/1/2$ vlan-id 839 l2fwder-vlan 300 vlan-scope local
admin>configure>bridge>port>1/1/1/1/8/1/2>vlan-id>839$ exit
admin>configure>bridge>port>1/1/1/1/8/1/2# max-unicast-mac 10
Configuration for HLX-TGV differs and is shown below.
admin>#configure bridge port 1/1/1/1/8/1/1
admin>configure>bridge>port>1/1/1/1/8/1/1$ vlan-id 35 l2fwder-vlan 100 vlan-scope local
admin>configure>bridge>port>1/1/1/1/8/1/1>vlan-id>35$ exit
admin>configure>bridge>port>1/1/1/1/8/1/1$ vlan-id 838 l2fwder-vlan 200 vlan-scope local
admin>configure>bridge>port>1/1/1/1/8/1/1>vlan-id>838$ exit
admin>configure>bridge>port>1/1/1/1/8/1/1$ vlan-id 839 l2fwder-vlan 300 vlan-scope local
admin>configure>bridge>port>1/1/1/1/8/1/1>vlan-id>839$ exit
admin>configure>bridge>port>1/1/1/1/8/1/1# max-unicast-mac 10

admin>#configure bridge port 1/1/1/1/8/8/1
admin>configure>bridge>port>1/1/1/1/8/8/1$ vlan-id 35 l2fwder-vlan 100 vlan-scope local
admin>configure>bridge>port>1/1/1/1/8/8/1>vlan-id>35$ exit
admin>configure>bridge>port>1/1/1/1/8/8/1$ vlan-id 838 l2fwder-vlan 200 vlan-scope local
admin>configure>bridge>port>1/1/1/1/8/8/1>vlan-id>838$ exit
admin>configure>bridge>port>1/1/1/1/8/8/1$ vlan-id 839 l2fwder-vlan 300 vlan-scope local
admin>configure>bridge>port>1/1/1/1/8/8/1>vlan-id>839$ exit
admin>configure>bridge>port>1/1/1/1/8/8/1# max-unicast-mac 10
6. Configure ip-host 1 for management
#configure qos interface 1/1/1/1/8/vuni upstream-queue 0 bandwidth-profile name:1G
#configure bridge port 1/1/1/1/8/vuni
#configure>bridge>port>1/1/1/1/8/vuni$ vlan-id 400
#configure iphost ont ont:1/1/1/1/8/1 dhcp enabled vlan 400
#configure iphost ont ont:1/1/1/1/8/1 admin-state up
7. Display ONT ip-host 1 address
#show iphost ont operational-data
operational-data table
=========================================================================================================
index                    |ip-address     |net-mask       |default-router |dns-addr      |sec-dns-addr
-------------------------+---------------+---------------+---------------+--------------+---------------
ont:1/1/1/1/8/1           172.17.180.90    255.255.255.0   172.17.180.1   172.16.180.240  185.228.168.168
NOTE: In order to ip-host work properly, the broadcast should be enabled on VLAN
#configure vlan id 400 new-broadcast enable5. ONT Configuration (QinQ – INTERNET, VOIP, IPTV – unrestricted c-VLANs)

Attention: Following configuration example is based on the HL-2BV model, which features 2 LAN ports and 1 POTS ports. Adjust the configuration as needed to suit your ONT model.
Before ONT configuration, set VLAN stacking on OLT (with NOT specified C-VLANs)
configure vlan id stacked:999:0 mode residential-bridge in-qos-prof-name name:Default_TC01. Create ONT interface and set up admin-state
#configure equipment ont interface 1/1/1/1/8 sernum HALN:5A6FA670 sw-ver-pland disabled iphc-allowed enable enable-aes disable
configure>equipment>ont>interface>1/1/1/1/8 admin-state up
2. Plan card slot type and definie quantity and type of ports (2 ETH in case of HL-2BV ) and 1x POTS
Remember to correctly specify the number of LAN and POTS ports on your ONT!
#configure equipment ont slot 1/1/1/1/8/1 planned-card-type 10_100base plndnumdataports 2 plndnumvoiceports 0 admin-state up
#configure equipment ont slot 1/1/1/1/8/4 planned-card-type pots plndnumdataports 0 plndnumvoiceports 1 admin-state up
NOTE:
Slot 1 is for Ethernet card -> #configure equipment ont slot 1/1/1/1/8/1
Slot 4 is for POTS card-> #configure equipment ont slot 1/1/1/1/8/4
Only for HLX-TGV model:
Slot 8 is for Ethernet 10G port/card -> #configure equipment ont slot 1/1/1/13/8
Configuration for HLX-TGV differs and is shown below.
#configure equipment ont slot 1/1/1/1/8/1 planned-card-type 10_100base plndnumdataports 1 plndnumvoiceports 0 admin-state up
#configure equipment ont slot 1/1/1/1/8/4 planned-card-type pots plndnumdataports 0 plndnumvoiceports 2 admin-state up
#configure equipment ont slot 1/1/1/1/13/8 planned-card-type ethernet plndnumdataports 1 plndnumvoiceports 0 admin-state up
3. Create QoS profile
#configure qos profiles bandwidth 1G committed-info-rate 0 assured-info-rate 0 excessive-info-rate 1000000
#configure qos profiles bandwidth 10G committed-info-rate 0 assured-info-rate 0 excessive-info-rate 10000000
4. Set ethernet ports speed/duplex and assign DBA profile
Attention: For ONT’s which have port 10G please use qos profile 10G
#configure ethernet ont 1/1/1/1/8/1/1 auto-detect auto admin-state up
#configure ethernet ont 1/1/1/1/8/1/2 auto-detect auto admin-state up
#configure qos interface 1/1/1/1/8/1/1 upstream-queue 0 bandwidth-profile name:10G
#configure qos interface 1/1/1/1/8/1/2 upstream-queue 0 bandwidth-profile name:10G
5. Add stacked vlan 999 to the bridge port eth1 and eth2
typ:admin>configure>bridge>port>1/1/1/1/8/1/1 max-unicast-mac 200
 vlan-id stacked:999:0
 tag single-tagged
exit
pvid stacked:999:0

typ:admin>configure>bridge>port>1/1/1/1/8/1/2 max-unicast-mac 200
 vlan-id stacked:999:0
 tag single-tagged
exit
pvid stacked:999:0
Configuration for HLX-TGV differs and is shown below.
typ:admin>configure>bridge>port>1/1/1/1/8/1/1 max-unicast-mac 200
 vlan-id stacked:999:0
 tag single-tagged
exit
pvid stacked:999:0

typ:admin>configure>bridge>port>1/1/1/1/8/8/1 max-unicast-mac 200
 vlan-id stacked:999:0
 tag single-tagged
exit
pvid stacked:999:0
6. Configure ip-host 1 for management
#configure qos interface 1/1/1/1/8/vuni upstream-queue 0 bandwidth-profile name:1G
#configure bridge port 1/1/1/1/8/vuni
#configure>bridge>port>1/1/1/1/8/vuni$ vlan-id 400
#configure iphost ont ont:1/1/1/1/8/1 dhcp enabled vlan 400
#configure iphost ont ont:1/1/1/1/8/1 admin-state up
7. Display ONT ip-host 1 address
#show iphost ont operational-data
operational-data table
=========================================================================================================
index                    |ip-address     |net-mask       |default-router |dns-addr      |sec-dns-addr
-------------------------+---------------+---------------+---------------+--------------+---------------
ont:1/1/1/1/8/1           172.17.180.90    255.255.255.0   172.17.180.1   172.16.180.240  185.228.168.168
NOTE: In order to ip-host work properly, the broadcast should be enabled on VLAN
#configure vlan id 400 new-broadcast enable6. ONT Configuration (QinQ – INTERNET, VOIP, IPTV – restricted c-VLANs)
Attention: Following configuration example is based on the HL-2BV model, which features 2 LAN ports and 1 POTS ports. Adjust the configuration as needed to suit your ONT model.
Before ONT configuration, set VLAN stacking on OLT (with specified C-VLANs)
configure vlan id stacked:999:100 mode residential-bridge in-qos-prof-name name:Default_TC0
configure vlan id stacked:999:200 mode residential-bridge in-qos-prof-name name:Default_TC0
configure vlan id stacked:999:300 mode residential-bridge in-qos-prof-name name:Default_TC0
1. Create ONT interface and set up admin-state
#configure equipment ont interface 1/1/1/1/8 sernum HALN:5A6FA670 sw-ver-pland disabled iphc-allowed enable enable-aes disable
configure>equipment>ont>interface>1/1/1/1/8 admin-state up
2. Plan card slot type and definie quantity and type of ports (2 ETH in case of HL-2BV ) and 1x POTS
Remember to correctly specify the number of LAN and POTS ports on your ONT!
#configure equipment ont slot 1/1/1/1/8/1 planned-card-type 10_100base plndnumdataports 2 plndnumvoiceports 0 admin-state up
#configure equipment ont slot 1/1/1/1/8/4 planned-card-type pots plndnumdataports 0 plndnumvoiceports 1 admin-state up
NOTE:
Slot 1 is for Ethernet card -> #configure equipment ont slot 1/1/1/1/8/1
Slot 4 is for POTS card-> #configure equipment ont slot 1/1/1/1/8/4
Only for HLX-TGV model:
Slot 8 is for Ethernet 10G port/card -> #configure equipment ont slot 1/1/1/13/8
Configuration for HLX-TGV differs and is shown below.
#configure equipment ont slot 1/1/1/1/8/1 planned-card-type 10_100base plndnumdataports 1 plndnumvoiceports 0 admin-state up
#configure equipment ont slot 1/1/1/1/8/4 planned-card-type pots plndnumdataports 0 plndnumvoiceports 2 admin-state up
#configure equipment ont slot 1/1/1/1/13/8 planned-card-type ethernet plndnumdataports 1 plndnumvoiceports 0 admin-state up
3. Create QoS profile
#configure qos profiles bandwidth 1G committed-info-rate 0 assured-info-rate 0 excessive-info-rate 1000000
#configure qos profiles bandwidth 10G committed-info-rate 0 assured-info-rate 0 excessive-info-rate 10000000
4. Set ethernet ports speed/duplex and assign DBA profile
Attention: For ONT’s which have port 10G please use qos profile 10G
#configure ethernet ont 1/1/1/1/8/1/1 auto-detect auto admin-state up
#configure ethernet ont 1/1/1/1/8/1/2 auto-detect auto admin-state up
#configure qos interface 1/1/1/1/8/1/1 upstream-queue 0 bandwidth-profile name:10G
#configure qos interface 1/1/1/1/8/1/2 upstream-queue 0 bandwidth-profile name:10G
5. Add stacked vlan 999 to the bridge port eth1 and eth2
typ:admin>configure>bridge>port>1/1/1/1/8/1/1
  max-unicast-mac 200
  vlan-id 100
    tag single-tagged
    l2fwder-vlan stacked:999:100
    vlan-scope local
 exit
  vlan-id 200
    tag single-tagged
    l2fwder-vlan stacked:999:200
    vlan-scope local
 exit
  vlan-id 300
    tag single-tagged
    l2fwder-vlan stacked:999:300
    vlan-scope local
  exit

typ:admin>configure>bridge>port>1/1/1/1/8/1/2
  max-unicast-mac 200
  vlan-id 100
    tag single-tagged
    l2fwder-vlan stacked:999:100
    vlan-scope local
 exit
  vlan-id 200
    tag single-tagged
    l2fwder-vlan stacked:999:200
    vlan-scope local
 exit
  vlan-id 300
    tag single-tagged
    l2fwder-vlan stacked:999:300
    vlan-scope local
  exit
Configuration for HLX-TGV differs and is shown below.
typ:admin>configure>bridge>port>1/1/1/1/8/1/1
  max-unicast-mac 200
  vlan-id 100
    tag single-tagged
    l2fwder-vlan stacked:999:100
    vlan-scope local
 exit
  vlan-id 200
    tag single-tagged
    l2fwder-vlan stacked:999:200
    vlan-scope local
 exit
  vlan-id 300
    tag single-tagged
    l2fwder-vlan stacked:999:300
    vlan-scope local
  exit

typ:admin>configure>bridge>port>1/1/1/1/8/8/1
  max-unicast-mac 200
  vlan-id 100
    tag single-tagged
    l2fwder-vlan stacked:999:100
    vlan-scope local
 exit
  vlan-id 200
    tag single-tagged
    l2fwder-vlan stacked:999:200
    vlan-scope local
 exit
  vlan-id 300
    tag single-tagged
    l2fwder-vlan stacked:999:300
    vlan-scope local
  exit
6. Configure ip-host 1 for management
#configure qos interface 1/1/1/1/8/vuni upstream-queue 0 bandwidth-profile name:1G
#configure bridge port 1/1/1/1/8/vuni
#configure>bridge>port>1/1/1/1/8/vuni$ vlan-id 400
#configure iphost ont ont:1/1/1/1/8/1 dhcp enabled vlan 400
#configure iphost ont ont:1/1/1/1/8/1 admin-state up
7. Display ONT ip-host 1 address
#show iphost ont operational-data
operational-data table
=========================================================================================================
index                    |ip-address     |net-mask       |default-router |dns-addr      |sec-dns-addr
-------------------------+---------------+---------------+---------------+--------------+---------------
ont:1/1/1/1/8/1           172.17.180.90    255.255.255.0   172.17.180.1   172.16.180.240  185.228.168.168
NOTE: In order to ip-host work properly, the broadcast should be enabled on VLAN
#configure vlan id 400 new-broadcast enableONT Managment
Note: Most provisioning and upgrade options below require ONT to have a valid IP Host setup. For detailed information regarding IP Host click here.
| Method | Configuration | Upgrade |
| Rest API V2 | [Example] | – |
| XML Provisioning [DHCP 66/67, WEB] | [Example] | – |
| OTT | – | [Example] |
| OLT CLI | – | [Example] |
| TR-069 [OLT CLI, DHCP 43] | [Example] | [Example] |
| WEB | [Example] | [Example] |
| Found something we can improve? Let us know at support@halny.com |