Have a Question?
EasyMesh implementation
| Tested with HALNy ONTs: HL-4GQV, HL-4GQVS, HL-4GQVS2, HL-4GXV, HL-4GXV-F, HL-4GMV2, HL-4GMV3, HL-4GMV4, HL-4GMVR, HALNy Routers: HLE-3GM, HLE-3GX-F | Supported on Version: V3.0.18/V3.1.18/V3.2.38 or above |
| Tested with HALNy ONT: HL-4BX3V-F, HL-4GX3VR HALNy Router: HLE-4BX3V-F | Supported on Version: V5.0.7 or above |
EasyMesh concept
Full home Wi-Fi coverage using EasyMesh on interoperable GPON ONTs and gateways is demonstrated in the video below:
Getting Started
EasyMesh can be enabled on HALNy ONTs using several configuration methods depending on the deployment scenario.
For quick setup and testing, the feature can be activated directly from the Web GUI. For more advanced use cases such as batch provisioning, automation or large-scale deployments, XML configuration files, REST API or TR-069 can be used.
The following sections describe all available methods.
Enable EasyMesh from the Web GUI
This method allows enabling EasyMesh directly from the device web interface. It is the simplest and fastest approach, recommended for initial setup, testing and small deployments.
Navigate to Advanced → EasyMesh, enable the feature, select the appropriate device role (Controller or Agent), and save the configuration.
The device will reboot to apply the changes.

Enable EasyMesh using an XML file
Upload the XML file to the device. The file should contain the appropriate EasyMesh parameters, including feature enablement and device role.

After importing the XML file, the device will apply the settings and reboot itself
Enable EasyMesh through REST API
EasyMesh can be enabled programmatically using the REST API. This method is recommended for integration with external systems, automation tools and custom provisioning workflows.
By sending the appropriate API request, the EasyMesh feature can be enabled and configured.
curl --location -g 'http://{{ont_ip}}:48626/api/v2/wlan/mesh' \ --data

'{
   "enable": "yes",
   "device_role": "CONTROLLER",
   "fast_roaming_enable": "NO",
   "fast_roaming_type": "OTA"
}'
curl --location -g 'http://{{ont_ip}}:48626/api/v2/wlan/mesh/apply' \ --data
'{
"apply":"yes"
}'Note: A device reboot is required for the changes to take effect.
curl --location -g 'http://{{ont_ip}}:48626/api/v2/commands/reboot' \ --data

'{
   "reboot":"now"
}'
Enable EasyMesh via TR-069
In operator environments, EasyMesh can be enabled remotely using TR-069. This allows centralized provisioning and management of devices through an Auto Configuration Server (ACS).
EasyMesh parameters can be pushed from the ACS to the ONT, enabling the feature and setting the device role without local access.
EasyMesh configuration is managed via the following node:
InternetGatewayDevice.X_HALNY_EasyMesh
Note: A device reboot is required for the changes to take effect.
EasyMesh Agent pairing
Follow the steps below to successfully pair an EasyMesh Agent with a Controller.

Best practices and important notes for EasyMesh setup
- Keep firmware up to date
Always use the latest firmware on all devices in your mesh topology. Ensure that both the Controller and Agent devices are running the same firmware version. - Check Wi-Fi band requirements
Before enabling EasyMesh, make sure your configuration meets the requirements for both the 2.4GHz and 5GHz Wi-Fi bands.
- Enable EasyMesh and assign roles correctly
On each device in the topology, activate EasyMesh and assign the correct role – Controller or Agent.
You can do this in the Advanced → EasyMesh tab of the web interface. - Prefer Ethernet backhaul and minimize Wi-Fi hops
If possible, use Ethernet backhaul to maximize Wi-Fi throughput.
When using Wi-Fi backhaul, keep the number of hops to the Controller to a minimum since each additional hop halves the maximum throughput. - Use the Sync feature
For consistent configuration across all devices, use the Sync tab to automatically synchronize mesh settings. This helps maintain stability and performance across the network. You can find more information about synchronization here. - Factory reset while removing device from network
If you need to remove a device from the mesh network, make sure to reset it to factory settings. This prevents unwanted reconnections or configuration issues. - Troubleshooting connection issues
If devices are having trouble connecting to the EasyMesh network:- Make sure you’re using the latest network drivers (Windows) or system updates (Android/iOS).
- Disable fast roaming (802.11r) if enabled — some older devices may not support it.
- Make sure all devices in the topology are properly synchronized. You can find more information about synchronization here.
- If you’re using the same SSID for both 2.4GHz and 5GHz, consider splitting them into two separate SSIDs for compatibility testing.
How to choose the right devices for EasyMesh
For optimal compatibility and performance, ensure that all devices in the EasyMesh topology use the same Wi-Fi standard. To achieve the best possible throughput, we recommend selecting devices based on the table below.
| EasyMesh Controller | EasyMesh Agent | |
|---|---|---|
| Wi-Fi 6 160 MHz |
HL-4BX3V-F HL-4GX3VR HLE-4BX3V-F |
HL-4BX3V-F HL-4GX3VR HLE-4BX3V-F HL-4GXV-F HL-4GXV HLE-3GX-F |
| Wi-Fi 6 80 MHz |
HL-4GXV-F HL-4GXV HLE-3GX-F | |
Wi-Fi 5 |
HL-4GMV2 HL-4GMV3 HL-4GMV4 HL-4GMVR HL-4GQV HL-4GQVS HL-4GQVS2 HLE-3GM |
HL-4GMV2 HL-4GMV3 HL-4GMV4 HL-4GMVR HL-4GQV HL-4GQVS HL-4GQVS2 HLE-3GM |
Features
HALNy devices offer additional features when operating with EasyMesh, such as:
Synchronization tab (Sync)
In the Advanced → EasyMesh tab on the Controller, go to the Sync tab to view the list of connected Agents and check whether they have successfully synchronized their settings with the Controller.
If a reboot is required, you will be notified and presented with a button that allows you to remotely restart the Agent to ensure proper synchronization.
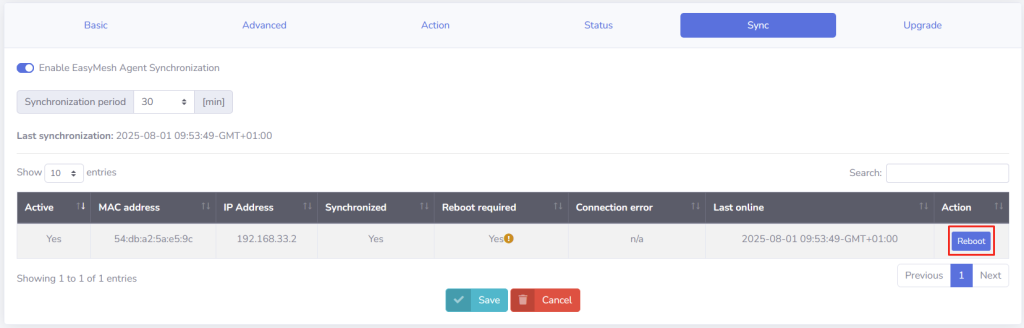
By default, the synchronization interval is set to 30 minutes, so the Agent information may only appear after that period. You can adjust this interval if needed.
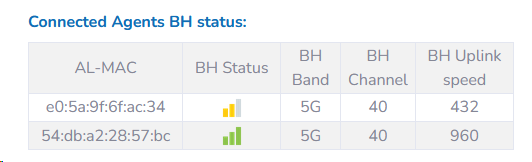
Signal strenght check
When using Wi-Fi backhaul, maintaining good signal quality between the Agent and the Controller is essential. You can check the current signal strength in two ways:
- Via web interface on a controller:
- By pressing the Wi-Fi button on the Agent for 3 seconds
After that, LAN 1-4 LEDs will indicate the RSSI values as follows:- LAN1-4 LED ON → RSSI > -40 (Excellent signal)
- LAN1-3 LED ON → RSSI > -55 (Good signal)
- LAN1-2 LED ON → RSSI > -70 (Fair signal)
- Only LAN1 LED ON → RSSI < -70 (Poor signal)
- LAN1-4 LED ON → RSSI > -40 (Excellent signal)
EasyMesh Agent upgrade
HALNy devices support a feature that allows remote firmware upgrades of EasyMesh Agents. This process is initiated from the Controller by providing necessary information about the server from which Agents should download firmware image.
More information about the EasyMesh Agent upgrade process can be found in a dedicated article linked here.
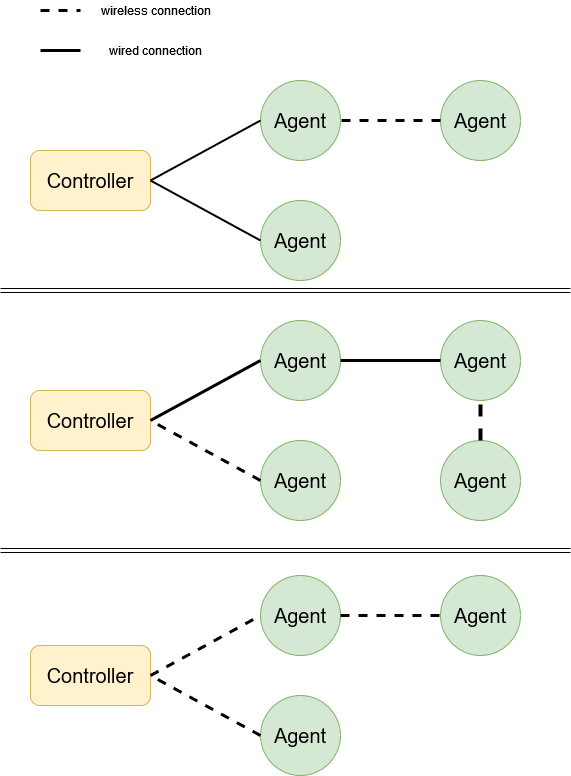
Topology examples
Our implementation of the EasyMesh feature allows for dynamic topology changes. You can add or remove agent devices without reconfiguring the entire network. New devices can be connected to the EasyMesh network via cable or WiFi.
When pairing, we recommend using the LAN ports instead of the WAN port on the router.
Below are some examples of correct mixed network topologies:
| Found something we can improve? Let us know at support@halny.com |